Draw a Box Around Text in Outlook
Please Note: This article is written for users of the following Microsoft Word versions: 2007, 2010, 2013, 2016, 2019, and Give-and-take in Function 365. If you lot are using an earlier version (Word 2003 or before), this tip may non piece of work for you lot. For a version of this tip written specifically for earlier versions of Word, click hither: Stopping Text from Jumping Around.
 Please Note: This article is written for users of the following Microsoft Word versions: 2007, 2010, 2013, 2016, 2019, and Give-and-take in Function 365. If you lot are using an earlier version (Word 2003 or before), this tip may non piece of work for you lot. For a version of this tip written specifically for earlier versions of Word, click hither: Stopping Text from Jumping Around.
Stop Graphics and Text from Jumping Around
Deborah had some bug with a cartoon object (a block arrow) placed backside the text of a tabular array with rows of fixed width. When Deborah would endeavour to nudge the pointer into position, the text would leap effectually, even after setting the Wrapping Style for the object to Behind Text.
The first thing to bank check, of course, is that the wrapping style didn't somehow get inadvertently changed. Select the cake arrow, brandish the Shape Format tab of the ribbon, click the down-arrow at the right of the Send Backward tool (in the Arrange group), and then choose Send Behind Text. If this is the setting that was already made, and then the next thing to check is where the object is anchored. Follow these steps if you are using Give-and-take 2010 or a subsequently version:
- Brandish the File tab of the ribbon, then click Options. Word displays the Word Options dialog box.
- Click Display at the left side of the dialog box. (See Figure 1.)
- Select the Object Anchors cheque box.
- Click on OK.
- In Print Layout view, select the shape (the block pointer). The object anchor for the shape should announced—it looks like an ballast.
- Click on the object anchor—not the actual cake arrow—and move the anchor until it is located to the left of a paragraph that will remain constant in the document. A good choice would be to place it to the left of the paragraph just before the table or just afterwards the table, depending on which i will exist on the aforementioned page as the table.
- Right-click the object (the cake arrow) and choose More than Layout Options from the resulting Context menu. Give-and-take displays the Layout dialog box.
- Make sure the Position tab is selected. (See Figure 2.)
- Brand sure the Move Object With Text cheque box is selected.
- Make sure the Lock Anchor check box is selected.
- Make sure the Allow Overlap check box is selected.
- Click on OK to shut the Layout dialog box.
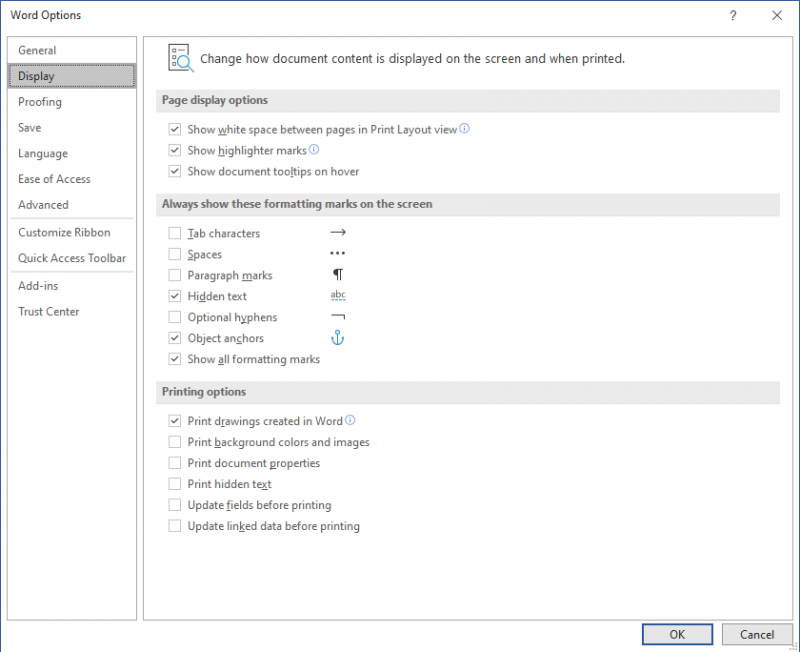
Effigy 1. The Brandish options of the Word Options dialog box.
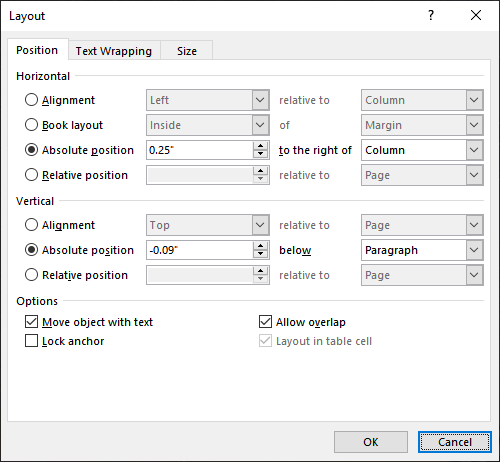
Figure 2. The Position tab of the Layout dialog box.
If yous are using Word 2007, the steps are slightly dissimilar:
- Click the Function button and then click Word Options. Discussion displays the Word Options dialog box.
- Click Display at the left side of the dialog box. (Meet Figure 3.)
- Select the Object Anchors bank check box.
- Click on OK.
- In Print Layout view, select the shape (the block pointer). The object anchor for the shape should appear—it looks like an anchor.
- Click on the object anchor—not the actual block arrow—and movement the anchor until information technology is located to the left of a paragraph that volition remain abiding in the document. A good choice would exist to place it to the left of the paragraph simply earlier the tabular array or just after the table, depending on which one volition be on the same page as the tabular array.
- Right-click the object (the block pointer) and cull Format AutoShape from the resulting Context carte du jour. Word displays the Format AutoShape dialog box.
- Make certain the Layout tab is selected. (Run across Effigy 4.)
- Click Advanced. Give-and-take displays the Avant-garde Layout dialog box. (Meet Figure v.)
- Make sure the Move Object With Text check box is selected.
- Make sure the Lock Ballast check box is selected.
- Make sure the Allow Overlap check box is selected.
- Click OK to dismiss the Advanced Layout dialog box.
- Click on OK to shut the Format AutoShape dialog box.
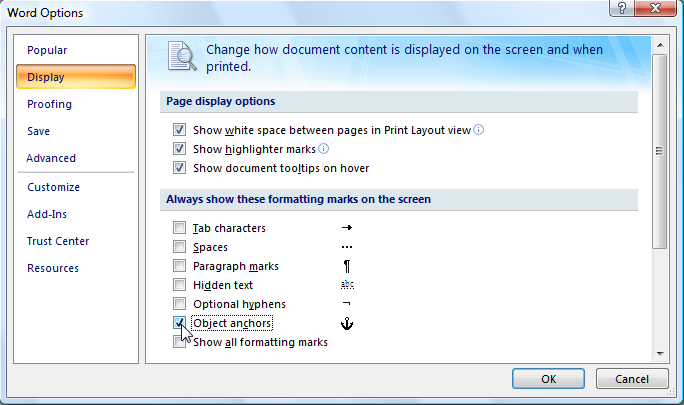
Figure iii. The Display options of the Word Options dialog box.

Figure 4. The Layout tab of the Format AutoShape dialog box.
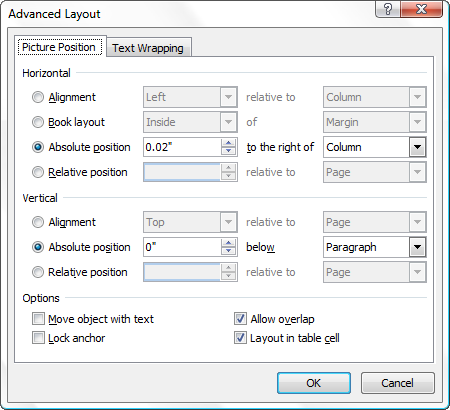
Effigy five. The Advanced Layout dialog box.
At this point you should still see the object anchor, but a little padlock appears next to information technology to indicate that it is locked. Now y'all should be able to adjust the positioning of the block arrow itself without your text jumping around.
WordTips is your source for price-effective Microsoft Word training. (Microsoft Word is the most popular give-and-take processing software in the globe.) This tip (10075) applies to Microsoft Discussion 2007, 2010, 2013, 2016, 2019, and Word in Role 365. You can detect a version of this tip for the older carte interface of Give-and-take here: Stopping Text from Jumping Effectually.
vondoussasirche1938.blogspot.com
Source: https://wordribbon.tips.net/T010075_Stop_Graphics_and_Text_from_Jumping_Around.html